. Olympus FV3000RS Confocal Microscope
FV3000RS
Location: Ross 913
Olympus FV3000RS Confocal Microscope
Please acknowledge NIH shared instrumentation grant 1S10OD025244-01 (Prof. Brian O'Rourke and Prof. Mark Donowitz). See below for more details, NIH RePORTER page is here.
==> Please note Olympus is now known as Evident Scientific.
June 14, 2022: a web site limitation prevents us from adding more content to this web page - please see "fv3000_part2"
April 19, 2022: Incubator control policy -- (temperature and/or CO2) -- (this policy has been in place since FV3000RS arrival 8/2018) adding on this web pagefor clarity.
|
The FV3000RS has an OkoLab incubator with temperature control (usually 37 C) and optional 5% CO2. The incubator requires 1 hour to warm up to stable temperature, and 1 hour to cool down to room temperature. The user needs to make their iLab reservation to include these two hours. If they communicate with the image core manager (Dr. McNamara, gmcnamara@jhmi.edu) we will typically change the session billing to make the "up" and "down" time no charge. Note: we reserve the rightr to bill during the time for short sessions. During warm up, experiment, and cool down times, you need to cover all openings to the microscope stand (objective lenses and electronics) so humidity cannot damage the equipment. For cool down, the openings to the objective lens and base need to stay covered, and usually the front and top doors ofthe plexiglas shroud will be opened to facilitate cool down. We prefer the doors be closed overnight - late afternoon users should discuss procedures with image core manager. Best practices: Plan ahead many days in advance for 37 C experiments. Schedule your FV3000RS time to keep the incubator at 37 C. for example, much better one long session, 8-9am on, 9am-4pm expt, 4-5pm off, than a series of 1 hour on-expt-off sessions. Similarly, if you can schedule consecutive days, then you could arrange with image core manager to keep the FV3000RS at 37 C overnight (usually at no charge to you), to avoid unnecessary temperature shifts. Please also communicate with other users (typically through image core manager since users cannot see who has other reservations) in case the prior and/or next user is operating at 37 C. Note: we have enabled users to successfully do 8 day timelapse experiments on FV3000RS (Jawara Allen and Cindy Sears). Our Keyence BZ-X700 microscope is also capable of multi-day timelapse experiments. |
January 20, 2022: Lambda scanning --- while setting up Lambda scan, check the Lightpath (tab next to detectors) to make sure the correct master beamsplitter is in place, such as BS10/90 (beamsplitter reflection 10%, transmission to detector path 90% -- I call this R10T90 on FISHscope), and appropriate deck 1 and deck 2, and HSD1_HSD2 and HSD3_HSD4 beamsplitters are in place, such as deck1= mirror, HSD1_HSD2 = glass, and HSD2 on. I found (today) HSD2 and HSD4 produce higher "counts" (output of A/D converter) than HSD1 or HSD3), with HSD2 being highest "counts" across entire spectrum (blue, green, red, NIR). Lightpath screen shot later on this web page.
-> I especially note that the FV3000RS software sometimes changes master beamsplitter and 'decks and HSD pairs' beamsplitters, without communicating to user --- current beamsplitter layout does show up in :light path" tab, that few users ever look at ---- which will put various beamsplitters (ex: master beamsplitter 405/488/561/640) in the light path vs BS10/90 likely being moe useful for labmda scans.
January 20, 2022: GM now recommends using HSD4 instead of NIR1 (no external filter cube, so NIR2 sees nothing), even with 730nm laser line. I suggest emission range 750-800nm (800nm is max wavelength) to stay at least 10nm from laser line (730nm laser line) with extra 'distance' so you can open pinhole (ex. 3 Airy Units, get moe light to detector). Also, have low expecations of NIR fluorophores.
November 4, 2021: NIR module GM testing on user slide with AF750-Phalloidin on intestinal epithelial organoids --> monolayer on transwell. Critical: currently we have no blocking filters in the NIR light path, so a mistake could send massive laser light signal to the detector and destroy it (and user may have to pay $20,000 to replace it). Success with:
* Alexa Fluor 750 positive (bright) slide (or Akoya Opal 780 tyramide), in focus using other channels on where the AF750 should be,
(i) no NIR cube (see Oct 20, 2021) for external module
(ii) "NIR Quad" master beamsplitter [405/488, 640/730] (tip: 561nm laser can be used, needs more power than with standard quad),
(iii) CH1 = NIR1 external box HV = 450 (standard is 500, for this purpose, 450 was better), NIR HV is set by using the knob on the external controller -- if wrong HV and too much laser power, a user could destroy the NIR detector(s), which is not under service contract ... could result in JHU taking salary away from the user(s) to pay for replacement (in other words: be super-careful to avoid depleting your bank account).
(iv) start 730nm laser at 0%, slowly increase (tap right arrow to step 0.01% each tap ... for example: may end up at 0.4%), to see signal. For unknown reason(s) there appears to be a threshold value to get fluorescence (weird, but now that this is known, can deal with).
(v) plan to use very bright NIR fluorophore, such as Alexa Fluor 750 tyramide (ThermoFisher, possibly special order) or Akoya Biosciences Opal 780 (Akoya has 8plex tyramides reagents).
Use: Get special NIR training from George. Probably start training with George's GATTAquant GATTA-cells NIR slide https://www.gattaquant.com/products/gatta-cells/gatta-cells.html as long as it remains usable. the "re-use" button for settings will be your friend -- but will always need to reset 730nm laser power to zero (0%) and step slowly to see signal.
(vi) 20220120H: The internal PMTs (HSD1-4) do provide signal in the NIR >700nm, so I recommend test HSD4 for whatever NIR wavelength range you need (tip: opening pinhole gets more light).
October 20, 2021: NIR module GM did "major surgery" on NIR module, can acquire adequately BRIGHT Alexa Fluor 750 with it - see box "20211020W NIR module update" for details (briefly: the emission filters are in the wrong positions AND appear to be glued in place ... see also Nov 4 tip above). GM recommends FISHscope (our widefield microscope with GPU deconvolution) for most NIR fluorophore imaging.
July 30, 2021: NIR works best with extremely BRIGHT Alexa Fluor 750 or Cy7 (or Akoya Opal 780, AAT Bioquest iFluor780, IRDye800 ... i.e. tyramide signal amplification "TSA", 750nm laser --> 760 dichroic --> 780LP --> NIR CH2). See above for later (10/20) discovery that the NIR module filter cube was assembled incorrectly.
May 5, 2021: Olympus sent me (GM) a 20 page PDF, FV3000 System Care Guide, with a lot of details on the internals of the FV3000RS. Image core users can email me for the PDF, since it is not currently online at the product resources page, https://www.olympus-lifescience.com/en/laser-scanning/fv3000/#!cms[focus]=cmsContent2545
March 9, 2021: added brief section below (search page for DIC) on FV3000RS DIC -- Differential Interference Contrast -- and Polarization Microscopy Settings (hint: Touch Panel AND "Ocular" tab - usually between LSM Imaging and Observation Method at top left of FLUOVIEW user interface).
20200708W: ZDC video at Olympus TruFocus Z Drift compensation
20191104M (November 4, 2019): we are now on JHU iLab for scheduling. See:
Our current equipment page for iLab scheduler links.
JHU iLab page for PI/admin to set up account number(s) and enable users.
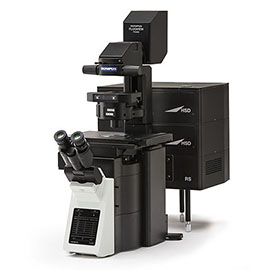
Our Olympus FV3000RS confocal microscope:
* IX83 inverted microscope stand.
* 405nm, 445nm, 488nm, 514nm, 561nm, 640nm and 730nm lasers. the 405-640 nm lines are Coherent OBIS solid state lasers; the 730nm is special NIR laser.
* FV3000RS scanhead with galvo and resonant scanners.
Galvo scanner: 1x to 40x zoom.
Resonant scanner: 1x to 8x zoom. (512x512 pixels).
* 6 position objective lens nosepiece turret, with:
* dry lenses: 2x (NA 0.08), 10x, 20x,
PLAPON2X; PLAN APO 2X NA 0.08,WD 6.2MM
UPLSAPO10X2; U PLANS S-APO 10X NA 0.40, WD 3.1MM
UPLSAPO20X; U PLAN S-APO 20X, NA 0.75, WD 0.6MM
* nice suite of three silicone oil objectives (30x, 40x, 100x) -- 1.405 refractive index. See Boothe et al 2017 ELife, https://elifesciences.org/articles/27240 for use with live cells and embryos.
| Name | Type | Immersion | Mag | NA | WD | coverglass (#1 and #1.5) | temperature |
| UPLSAPO30XS | UPLSAPO N | SI OIL | 30x | 1.05 | 0.8 mm | 0.13 - 0.19 mm | 23 & 37 C |
| UPLSAPO40XS | UPLSAPO | SI OIL | 40x | 1.25 | 0.3 mm | 0.13 - 0.19 mm | 23 & 37 C |
| UPLSAPO100XS | UPLSAPO | SI OIL | 100x | 1.35 | 0.2 mm | 0.13 - 0.19 mm | 23 & 37 C |
Coverglass thickness specifications from https://www.tedpella.com/histo_html/coverslip-info.htm (alsop has technical details om Schott borosilicate glass)
No. 00 = ~70 um (0.06 - 0.08mm)
No. 0 = (0.08 - 0.12mm)
No. 1 = (0.13 -0.16mm)
No. 1.5 = (0.16 - 0.19mm)
No. 1.5H 170 +/- 5 um (High precision) Ex: Marienfeld (Germany). Available from Zeiss web store, ThorLabs, others. ibidi (#1.5H) and mattek (-0.170-) sell imaging dishes.
No. 2 = (0.19 - 0.23mm)
GM recommends #1.5H coverglass for all work - in case you want to image at high resolution. Exception being special case of #00 (nominally 70um) or #0 (nominally ~100 um) for extra working distance.
Refractive indicies
ne (λ = 546.1nm): 1.5255 ±0.0015
nD (λ = 589.3nm): 1.5230
Above value ve: 55
GM note: in principle, one could use #00 coverglass nominally ~70um, or #0 coverglass, nominally ~100 um, refractive index match "as much as you can", adjust correction collar "as much as you can" (be sure to return to standard seting for next user!), to gain an extra ~70 um working distance compared to standard #1.5 nominally 170 um coverglass. For more working distance, you might be able to use SIMPORE's G-Flat Silicon Oxide "membranes", 20 nm to 1 um thickness, typically up to 2x2 mm area (small!!!), or one of their other products, see http://www.simpore.com/silicon-membranes -- ibidi has one of their membranes with pores in a double sided perfusion chamber slide.
| Laser | Laser (rated) |
Before scan head 2020 0709H |
Before scan head 20200716H |
Before scan head 2021 0430F before adjust |
Before scan head 2021 0430F after adjust |
Before scan head 2021 0507F new 445 / 514nm optical fiber |
2022 0503U before tune-up (all above spec) |
2022 0503U after tune-up (all above spec) |
future _____ |
future ___ |
future ___ |
future ___ |
future ___ |
future ___ |
Fluorophores |
| 405 | 50 mW | 16.20 | 14.60 | 11.30 | 12.40 | 10.9 | 11.4 | BV421, SB436, SuperNova v428, DAPI, Hoechst | |||||||
| 445 | 75 mW |
0.24 (before fix) |
4.80 (fixed) |
0.08 | 1.10 | 5.00 | 4.3 | 4.4 | mTFP1 (see fpbase.org) | ||||||
| 488 | 20 mW | 13.56 | 13.30 | 11.60 | 12.80 | 12.0 | 12.1 | AausFP1 GFP (5x brighter than EGFP), EGFP, Alexa Fluor 488 | |||||||
| 514 | __ mW |
0.75 (before fix) |
11.20 (fixed) |
0.42 | 2.60 | 13.10 | 11.4 | 11.5 | mVenus, V23, V3, V4, V5, V6, V8 (V8 still not published by Steve Vogel, other V's are in addgene) | ||||||
| 561 | 20 mW | 13.65 | 14.70 | 13.30 | 14.50 | 13.9 | 14.1 | Alexa Fluor 555, Alexa Fluor 568 | |||||||
| 640 | 40 mW | 19.70 | 22.00 |
0.016 mW (we did get signal) |
23.90 (new laser) |
22.9 | 23.1 | Alexa Fluor 647, Cy5, ATTO 647N, IRDye680, IRDye700 | |||||||
| 730 | __ mW | n/a | n/a | 21.40 | 21.50 | 21.5 | 21.6 | Alexa Fluor 750, Cy7, IRDye 800 |
Table notes: (i) 20200709H fiber from 445/514nm laser launch to main (other 4 vis) launch had developed a problem, was replaced 20200716H. (ii) Power measurements are recorded 12.34 mW, two digits after the decimal point. This is for consistent formatting, please do not assume statistically significant. (iii) Pair of visits 20210430F and one week later 20210507F: (i) replaced 640nm laser, (ii) replaced 445/514nm optical fiber, (iii) routine alignment of all six lasers (or their beam combining dichroics) in the beam combiner module (the 730nm is launched separately), (iv) recieved from field service engineer the (new) 20 page PDF, "FV3000RS System Care Guide", with a lot more detail of what is inside the scanhead (PDF available to our users from GM).
* We typically operate with the "ND10" (10% transmission) filter in (engaged) and 0.1% to 1% power settign of the intensity slider, for each laser line. Can also attenuate power by using MBS with the "BS10/90", which is equivalent to our "RT10/90" (Reflection 10% / Transmission 90%) in our FISHscope (we also have a "R03/T97 beamsplitter in FISHscope).
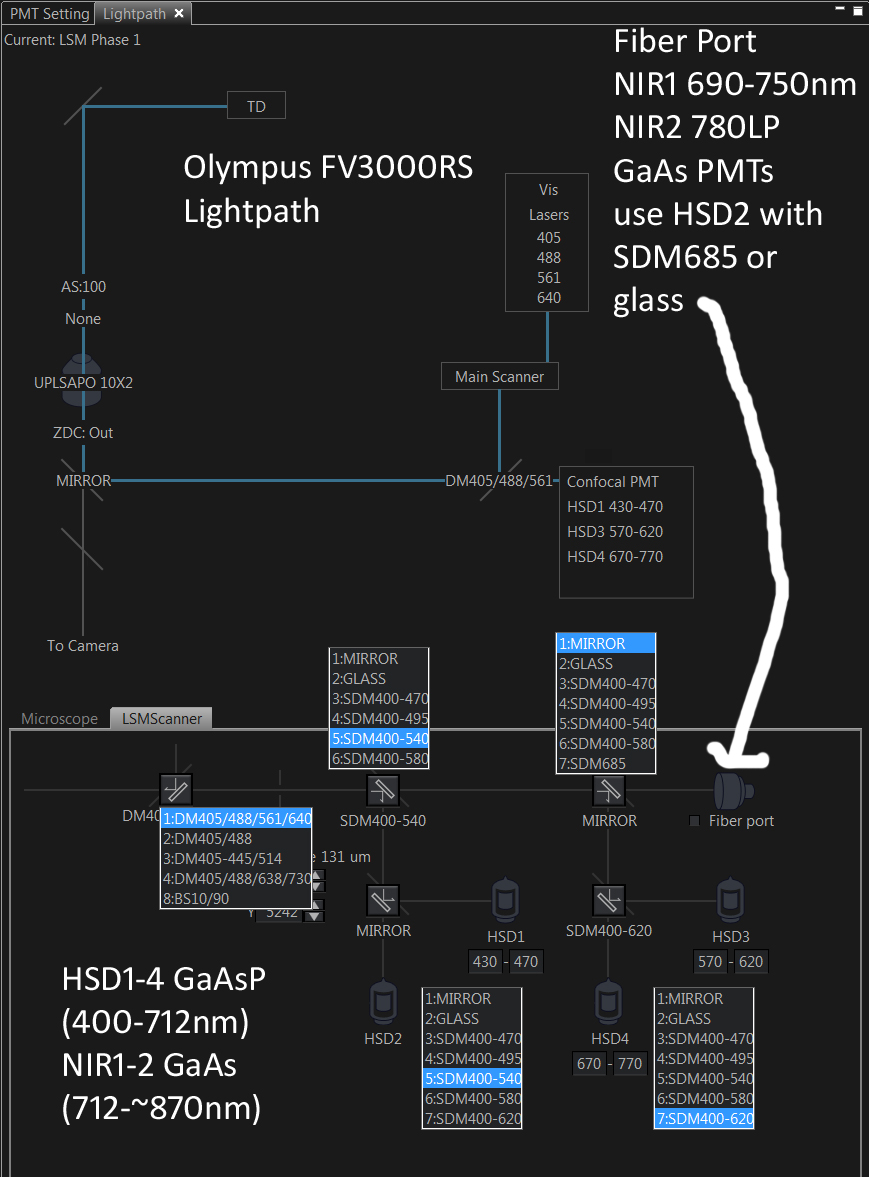
* Master beamsplitters ("MBS"): Most users use the standard quad DM405/488/561/640 with the four designated laser lines. We have found that using an "off target" laser line works fine, just need to crank up the laser power in the software (and possibly switch from ND10 to no ND). Our current set of MBS, between decks, and within decks are shown below. The "fiber port" path goes to our two external NIR1 CH1 and NIR2 CH2 GaAs PMTs (see graph below for QE curves for GaAsP and GaAs PMTs (the checkbox next to Fiber port sets the between decks beamsplitters to Glass, we typically leave this UNchecked, and use SDM685 between deck 2 and external ... with multiple scan tracks we could have the whatever beamsplitters and internal and external PMTs we want).
==>Lambda scanning: GM recommends BS10/90, Mirror (deck1), Glass (HSD1_HSD2=HSD2), HSD2 at 500 V (HSD2 and HSD4 give higher counts than HSD1 and HSD3 ... high 'counts' not necessarily better SNR signal-to-noise ratio, which is less trivial to measure).
* Four internal "spectral" GaAsP fluorescence photomultiplier tube (PMT) detectors (most '3000s have two GaAsP, two 'standard' PMTs).
* Two external GaAs near infrared fluorescence photomultiplier tube (NIR PMT) detectors (nearly all '3000s lack any external detectors). Standard HV is 500 mV.
Comparison of GaAsP and GaAs PMTs quantum efficiencies from Wang 2016 IEEE Photonics Journal.
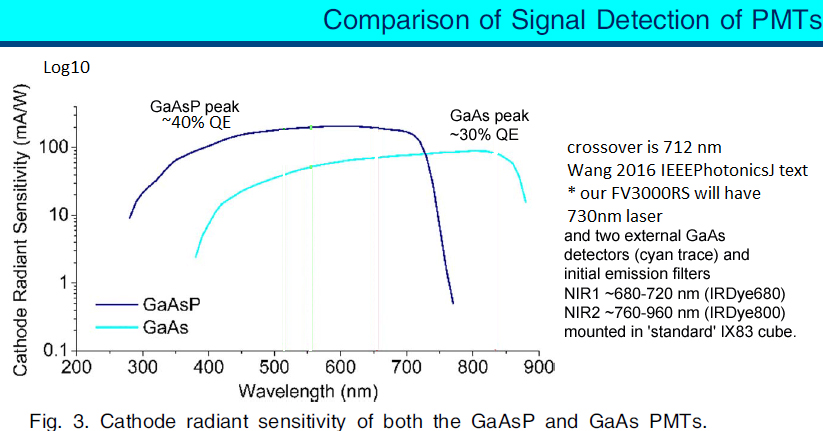
[GaAsP vs GaAs ... transition wavelength 712 nm]
NIR dichroics and emission filters:
T685LPXR ... T685lpxr; Long-pass dichroic 685nm 12.7x2mm unmounted (inside scanhead) ... simultaneous 6plex fluorescence: enables all 4 internal + the 2 external detectors to be used simultaneously.
T760LPXR; 760nm DICHROIC BEAMSPLITTER 26MMX38MM (standard Olympus filter cube splitting NIR1 and NIR2 PMTs)
ET720/60M ... NIR1 GaAs PMT emission filter.
ET780LP ... NIR2 GaAs PMT emission filter.
* Transmitted light detector.
* RS = Resonant Scanner (high speed).
* Standard confocal galvo scanner also installed (i.e. large field of view, high pixel count).
* laser autofocus (ZDC2 = zero drift compensation).
* SSU "ultrasonic" gliding stage (much nicer than a typical motorized stage).
* OKO Lab stage top incubator.
* Advanced software set
* 3D DECONVOLUTION (license moved 7/2019 to our new FISHscope).
* COUNT & MEASURE FULL
* CELLSENS DIMENSION DESKTOP
We have both galvanometer (various image formats, some examples are 512x512, 1024x1024, 2048x2048, 4096x4096 pixels) and resonant scanner modes.
Olympus FV3000RS Resonant Linescan Mode
8000 lines per second, 512 x 1 pixels.
Resonant scan mode is 10-bit dynamic range, 0 .. 1023.
Need to use Zoom = 1
No averaging
Go live, click on Line ROI, click in image window … position horizontal line.
Detector(s):
Low laser power prudent to not kill your cells.
Good to check that the master beamsplitter and all dichroics are set correctly.
Detector emission bands should be at least 10 nm from any laser line (protect our PMTs!).
1.0 Airy units is ‘standard’ confocal pinhole size. See below for more on this.
HV 500 mV is ‘standard of care’ for our GaAsP internal and GaAs external PMTs.
Gain = 1.0 (always).
Offset … typically 1 or 2%… goal is to have zero light be above zero intensity (~50 is good).
Optional: You can increase dynamic range by turning on TWO or more detectors, with adjacent bandpasses, assuming your fluorophore and a detector pair dichroic splits the light path, such as 540nm split to PMT1 and PMT2. (I would like to see an option for polarizing beamsplitter or neutral density filter, and have FluoView ‘do the math’) (concept adapted from Ralph Weissleder "HDR" confocal publications - they use 90/10 beamsplitters, we think 'spectral splitting' makes more sense and is safer for the detectors). You do the math later, i.e. Fiji ImageJ or MetaMorph to add the channels together.
2. Scanning times at 512x512 pixel format, no averaging (multiple by 2, 3, etc, up to 16, if averaging).
Resonant Scan Pixel dwell time line frame Typical
Uni-directional 0.067 usec 0.127 msec 65.729 msec 16 line average --> 1 second for single scan track, 512x512 pixels, zoom to Nyquist sampling pixel size.
Bi-directional 0.067 usec 0.063 usec 33.333 msec
Galvo Scan Pixel dwell time line frame
Uni-directional 2.000 usec 2.116 msec 1.086 seconds 5 line average --> scan time depends on image format (max 4096x4096 pixels).
Bi-directional 0.500 usec 0.488 msec 0.250 seconds
***
20220120H: Image formats and acquisition time
We normally operate in Galvonometer mode, 2 microsecond pixel dewll time (2 usec), "whatever" line averaging sufficient your user needs (I use max of 16 below, could use time series or Z-series with very small steps, and average or sum on your own, to get more averaging).
|
Image format (galvo unless RS) (all with 16 line averaging) |
Image Time (seconds) |
single line scan time (milliseconds/line) |
"Flyback" time (milliseconds/line) |
| 512x512 Resonant scanner (RS) bidirectional | 0.53 | 0.034 | 0.029 (acquiring) |
| 512x512 Resonant scanner (RS) unidirectional | 1.04 | 0.034 | 0.092 (dark time) |
| 512x512 galvo | 17 | 1.024 | 1.092 |
| 1024x1024 ("1x" pixel count") | 51 | 2.048 | 1.092 |
| 2048x2048 ("4x pixel count", 3.33x time) | 170 | 4.096 | 1.092 |
| 4096x4096 ("16x pixel count", 11.9x time) | 608 | 8.192 | 1.092 |
GM note: there is some overhead for each image dur to 'overscan' of some areas outside the scan area. My main point here, for glavo, unidirectional, is that "flyback time" is the same for all four galvo settings shown, so acquisition is faster than proportional.
***
Pinhole setting: 1 Airy Unit is standard, you can choose a different value (and is different for same diameter, different emission wavelength bands). Brightness is area of a circle (pi * r^2), relative to 1 Airy unit, and implies one subresolution fluorescent volume. Examples:
0.5 Airy unit … 1.2x better resolution per axis, but (0.5)^2 = 0.25 brightness.
0.6 – 0.7 A.U. … ~1.1x better, (0.6)^2 = 0.36, to (0.7)^2 = 0.49, “confocal sweet spot” – Jeff Reece, NIH.
0.666 A.U. … ~1.1x better, (0.666)^2 = 0.44, “confocal sweetest spot” – GM single value alternative to J.R.’s range.
1.0 A.U. … 1x … please note that this diameter pretty much matches the excitation laser spot size.
1.5 A.U. … more light, both from adjacent XY and above and below.
2.0 A.U. … even more light, both from adjacent XY and above and below.
3.0 A.U. … yet more light, both from adjacent XY and above and below.
>> A.U. … quasi widefield of spot illumination. Can be helpful finding right focus of specimen (if careful).
***
IX83 microscope stand filter cube sets (most are for eye)
| # | TFT touch panel name | Olympus name | Specifications (Semrock) | Descriptor | Typical fluorophores |
| 1 | Mirror (confocal) | ||||
| 2 | IX3-FDICT | ||||
| 3 | DAPI | U-FUW | 365/50x, 410DM, 420LP | UV WIDE LONGPASS |
DAPI, HOECHST, ALEXAFLUOR405 |
| 4 | FITC | U-FBNA | 482/25x, 505DM, 530/40m | BLUE NARROW | EGFP, FITC, ALEXAFLUOR488, JC-1, EYFP |
| 5 | TRITC |
U-FGNA or U-FRFP |
545/10x, 570DM, 600/50m or 545/20x, 565DM, 597/55m |
GREEN NARROW |
DsRED, ALEXAFLUOR568, mCHERRY, TRITC (we probably have this cube) or RFP, TagRFP, DsRED |
| 6 | MCHRY | U-FMCHE | 575/20x, 595DM, 645/90m | mCHERRY/GREEN WIDE | mCHERRY, mAPPLE, FUSIONRED |
| 7 | |||||
| 8 |
GM note 20211207U: I was recently able to see by eye Alexa Fluor 633 on our FISHscope Penta cube, 640nm excitation, ~660nm emission. I have now tested our FV3000RS IX83 "MCHRY" filter set with the same microscope slide with bright Alexa Fluor 633 (anti-NHE3) and am able to see AF633 by eye. I note that the slide also has Alexa Fluor 568 (WGA = Wheat Germa Agglutinin), visible in both "TRITC" and MCHRY cubes, so found cells that were bright in MCHRY cube, so AF633 positive while dim in TRITC cube so AF568 dim or negative. I also note that AF633 is not a great fluorophore, and that I strongly encourage all users to choose AF647 or ATTO647N or Abberior STAR RED (AF647 ATTO647N equivalent, may be brighter than either) for experiments. I also note that Alexa Fluor 610-X is "in play" as yet another fluorophore, and is superior (at least with respect to dye to dye comparisons) to Alexa Fluor 594 and Texas Red - see Maillard 2020 Chem Sci 12: 1352, https://pubs.rsc.org/en/content/articlelanding/2021/SC/D0SC05431C discussed further at http://confocal.jhu.edu/mctips/multiplex
***
** Please note that image core management sometimes has to cancel/postpone user sessions due to required service visits or other reasons. When this happens we will try to make the user's next imaging session be "no charge" (even if longer than the cancelled session).
Please acknowledge NIH shared instrumentation grant 1S10OD025244-01 (Prof. Brian O'Rourke and Prof. Mark Donowitz).
For details on our award, please see
https://projectreporter.nih.gov/project_info_details.cfm?aid=9493650
Our recommendation for Acknowledgement section of your manuscript is:
The Olympus FV3000RS confocal microscope was acquired with NIH shared instrumentation grant 1S10OD025244-01 (Prof. Brian O'Rourke and Prof. Mark Donowitz) and used in the Ross Fluorescence Imaging Center, Hopkins Conte Digestive Diseases Basic & Translational Research Core Center.
Rate: $27/hr.
Please note that our G.I. Center supplements its members use.
* We thank:
Jason Brenner and John Gibas, Olympus, for demonstrating the system.
Prof. Brian O'Rourke, PI of the NIH grant (and Associate Director of our core).
Prof. Mark Donowitz, S10 grant co-author, P.I. NIH P30DK089502 grant funded Hopkins Digestive Diseases Basic and Translational Research Core Center, and much more.
Prof. Olga Kovbasnjuk - former core Director, now at University of New Mexico.
All the 8 Major and 2 minor project P.I.'s and users, for making demo(s) successful.
NIH and U.S., taxpayers, for the grant; NIH S10 shared instrumentation 'confocal microscopes' study section members, and NIH Council, for our award.
Olympus for accepting our Zeiss LSM510META confocal microscope scanhead for credit toward our new microscope.
*******
The NIH S10 grant proposal projects that enabled our funding of the FV3000RS -- these, and newer-than-S10 pilot projects, are our priorities for year 1 (Sept 2018-August 2019), and we seek to enable their ongoing research.
Major Users projects:
1) Mark Donowitz, MD, Coordinated Regulation of Intestinal NaCl Absorption and Anion Secretion in Health and Disease.
2) Pankaj Pasricha, MBBS, MD/Subash Kulharni, PhD, Imaging the structure of the Enteric Nervous System and its associated cells.
3) Cynthia Sears, MD, Bacterial Biofirms and Colon Cancer, with Emphasis on Toxigenic B. Fragilis.
4) Nicholas Zachos, PhD, Mechanisms of Diarrhea Examined by Live Cell Imaging of Human Enteroids.
5) Brian O'Rourke, PhD, Project Title: Mitochondrial dysfunction as a source of cardiac arrhythmias and heat failure.
Minor Users projects:
6) Joanna Melia, MD, ZIP8 as a Mediator of Intestinal Inflmmation and Intracellular Zinc Homeostasis (Zinc ion micronutrient transporter in Inflammatory bowel diseases, including Crohn’s disease and ulcerative colitis).
7) Jennifer Foulke-Abel, PhD, Enterotoxigenic E. coli pathogenesis and human enteroids (ETEC),
8) David A. Kass, MD, Leveraging Protein Kinase G-1 Nanodomain Control and Molecular Targeting to Enhance its Therapeutic Use Against Myocardial Disease.
Two of our Minor Users moved to University New Mexico (not shown) - we hope the time made available will help support our GI Center's pilot projects, and additional users from all over.
*******
Please note the news items sometime include policy statements.
News:
June 26, 2020: free OlyVIA viewer, download at https://www.olympus-lifescience.com/en/image-sharing-made-easy-meet-olyvia/ or look on our file server (OlyVIA).
June 19, 2020 FV3000RS usage tip for very bright labeling (ex. fluorescent Pharlloidin to label F-actin)l;
|
FV3000RS confocal microscope - avoid fluorophore saturation of very bright signals: "even lower" laser power than 0.01% laser power by using a different Master Beamsplitter … if use an “MBS” that does not list the laser line, then laser at specimen is ~1% of the slider value … so if slider is 5% then ‘wrong MBS à ~0.05% Note: Standard of care PMT “HV” (high voltage) is 500 mV (500 in software). Users can use lower values, ex. 450 or 400, but Hamamatsu (PMT manufacturer) and Olympus (confocal) have informed us 500 mV is optimal for these detectors. |
October 4, 2019
1. we are moving to Agilent iLab Organizer ... went live November 4, 2019.
April 22, 2019: Use of our two NIR GaAs photomultipliers (PMTs):
|
GM 20211020W NIR module update in October 2021 George obtained GATTAquant GATTAcells NIR slide (DAPI, AF488-mito, AF647-actin, AF750-tubulin) https://www.gattaquant.com/products/gatta-cells/gatta-cells.html enabling testing of the "NIR module" (740 nm laser, filtere cube below, NIR PMTs 1 and 2). GM conlcudes that the filter cube has the emission filters in the wrongpositions with respect to the dichroic beamsplitter light path. Unfortunately, the emission filters are stuck - cannot be removed without risking breaking stuff (GM has been dealing with filter cubes since ~1992, nearly 30 years ... may in future apply carefully some WD-40 liquid to try to loosen the retaining rings - filter coatigns are hard coated, should survive). To make the NIR module useful, GM removed the filter cube. This puts the NIR1 PMT at risk of damage from laser light (and makes NIR2 unusable since no light reaches it). Any user who wishes to use the NIR module needs BOTHtraining AND supervision from George. Personally (GM) thinks for most users, FISHscope is a better choicefor acquiring NIR (widefield plus GPU deconvolution).
*** see also 20220614U update (below) and https://www.olympus-lifescience.com/en/landing/fv3000nir |
Light path
Internal & External T685LPXR ... <685nm internal PMTs 3 and 4, >685nm external NIR1 and NIR2 PMTs.
External dichroic T760LPXR ... Split light for NIR1 and NIR2 PMTs.
NIR1 emission filter ET720/60M ... 690-750nm
NIR2 emission filter ET780LP ... 780+ nm (GaAs sensitivity limit ~860nm).
Critical safety issue: our 730nm laser line is within the emission band of NIR1 emission filter. It is critical that no user sends 730nm laser light to NIR1 (also true for the other laser lines and internal detectors).
- the optimum "HV" = 500 (best signal to noise ratio ... +50 HV and 2x laser power give similar brightness, low laser power usually best to minimize risk of photobleaching ...examples: HV500 with 0.8% laser OR HV550 with 0.4% laser OR HV600 with 0.2% laser), and are controlled by knobs on each of the two power supplies above the electronics cabinet (the front panels are: 0.500 Volts = 500 mV). 500 according to Jason Brenner, our Olympus confocal salesperson. GM is ok with user's evaluating other settings (i.e. 600, 700), note that the saturation warning (HiLo software LUT) cangive way to a protection circuit ... upshot is do NOT saturate the NIR PMTs (or our GaAsP internal PMTs).
- these GaAs PMTs have higher quantum efficiency (QE) above 712 nm, compared to using the four internal GaAsP PMTs -- see Wang 2016 IEEEPhotonics.graph later on this web page.
- We plan to purchase Spherotech UltraRainbow fluorescent beads, fluoresce from UV to NIR, for testing --> our thanks to Olympus tech support for suggestion.
- We expect Li-Cor Dyes IRDye680 (or IRDye700) on "CH1" (EXTERNAL pmt #1) and IRDye800 on "CH2" (external PMT #2) will work well ... compatibility with Donowitz lab (and many other research labs) Li-Cor Odyssey Western blots 'gel documentation & quantitation' systems (NIR fluorescence works nicely for Western blots inpart because lower autofluorescence of the support matrix, glass, etc).
- Li-Cor dyes are not the only option: some AlexaFluor, Abberior, ATTO, CyDyes, could be used. GM is especially hoping that chlorins and bacteriochlorins will work well (i.e. antibody or oligonucleotides), since extremely narrow emission spectrum -- NIRvana Sciences has graphed 8 dyes emission 600-800 nm range (see background graphic for Bruce Pitner, CSO, NIRvana Sciences, on linkedin). Of course 8 bacteriochlorins would be best imaged simultaneously, maybe all four internal GaAs (600-700 nm, if FV3000RS dichroics were optimized for this), plus FOUR external (we have two now): i.e. one GaAsP for 700-725 nm dye, three GaAs PMTs. Of course if NIRvana and/or other can "do" 8 dyes in 600-800nm, maybe could "do" an additional four in 800-900 nm, implying an additional four external detectors (for 8 total, plus the four internal). I also note that chlorins and bacteriochlorins might work well as tandem acceptors of Brilliant Ultraviolet, Brilliant Violet, Brilliant Blue, and Brilliant Green-Yellow, for potentially 4 donors * 12 acceptors ==> 48plex NIR + the four donors = 52plex (plus spatial resolution could be of the photons from the donors, since not 100% transfer to acceptors ... see my linkedin blog, "Resolution Blues", https://www.linkedin.com/pulse/resolution-blues-meets-21plex-salute-fluorescence-basic-mcnamara/ and Brilliants in graphic table in March 29, 2019, news immediately below.
- The current filter cube splitting the light onto CH1 = 690-750 and CH2 = 780LP, is exchangable ... if someone would like to invest in, and donate to the image core more cubes (Olympus IX83 standard format cubes), or convince us to spend our core money on cube(s) [we think simpler to gain experience with current cube).
March 29, 2019: Brilliant Violet BV421 works fine on our confocal microscopes (used twice on SP8 for live cells).
2019 plex
When will confocal microscope users start using Brilliant Violets and Brilliant Blues and/or SuperBrights?
BD Fluorophores Table
More of my thoughts on Brilliants, and similar (SuperBrights, NIRvana prototypes, etc) at my linkedin Pulse blog pages:
20190223: https://www.linkedin.com/pulse/fluorescence-spectra-graphs-george-mcnamara
20180505: https://www.linkedin.com/pulse/18plex-flow-cytometry-from-brilliants-when-catch-up-george-mcnamara
20170914: https://www.linkedin.com/pulse/resolution-blues-meets-21plex-salute-fluorescence-basic-mcnamara
and BD Biosciences is now at 21plex for all Brilliants
https://www.bdbiosciences.com/us/instruments/research/cell-analyzers/bd-facsymphony/m/6022968/reagents
BUV ... 7plex ... note: we do not have a UV laser (and have not tested -- yet -- whether our CW 640 nm or 730 nm lasers will result in 2-photon excitation of BUVs or BVs).
BV ... 9plex (!!!) of which BV510 is wide emission spectrum (in principle, not an issue if acquisition settings and spectral unmixing algorithms 'deal well with it' ... probably best to use BV510 on some 'dump channel').
BB ... 5plex.
BYG ... 1plex (as of 20190331), should be possible for BD Biosciences to make more.
So, on our FV3000RS, potential for 9 BV + 5 BB + 1 BYG = 15plex.
Brilliant's are typically direct label antibodies, so, if $1 per plex per microscope slide or imaging dish, $15 for one assay. I suggest staining cells in suspension, doing flow cytometry, and bringing 'left over' cells to the imagecore(please use minimal biohazard cells!!!).
Note :Biolegend has 8 Brilliant Violets available:
https://www.biolegend.com/brilliantviolet
www.Phitonex.com ... 19plex with 488, 561, 640 nm laser lines (and may have more by end of 2020).
https://www.bdbiosciences.com/us/instruments/research/cell-analyzers/bd-facsymphony/m/6022968/reagents
[FACSSymphony Reagents - Table]
March 15, 2019: ZDC830 installed = Olympus Zero Drift Compensation unit wavelength changed from 730nm (temporary unit shipped with installation) to 830nm.
Please note: 830nm is in the wavelength range of External PMT #2 ("ePMT#2" sixth pmt on the confocal).
Depending on your settings, the ZDC 830 nm signal might get to "ePMT#2", so please turn off "continuous ZDC" if using ePMT#2.
December 20, 2018: Tip - transferring files/folders to Microsoft OneDrive:
I suggest using 7-ZIP to package all of your session's files&folders into a single zip file (ex. Mary Elizabeth Garrett 20181220Thur awesome FV3000RS expt.zip).
Every JHU staff (employee, student) gets 5 Terabytes of Microsoft OneDrive space (MyJHU -> Cloud -> OneDrive), so nice way to back up all your data.
November 27, 2018: Our OkoLab inserts are not a good match to LabTek chamber slides (even though oneinsert is for LabTek).
We recommend using 35 mm imaging dishes. For example, www.cellvis.com 35 mm imaging dishes are $1 to $2 per dish
($100 to $200 per case of 100 dishes), depending on format (and offer other formats).
https://www.cellvis.com/_35-mm-glass-bottom-dishes_/products_by_category.php?cat_id=3
Other companies have imaging dishes, such as Mattek (35 mm formats) and WPI (FluoroDishes).
November 13, 2018: 7 and 6 !!! 730nm laser and GaAs NIR PMTs are here bringing us to 7 lasers and 6 PMTs.
The NIR PMTs should be used at 0.500 HV (just leave the external boxes as is). The internal FluoView software controls do not do anything, just ignoe them.
It is possible to have all 7 laser lines active by enabling all seven detectors (HSD1-HSD4, TD, CH1, CH2) and selecting different laser lines for each.
October 19, 2018: OkoLab incubator policy:
Temperature: if you are using, turn on one hour before your session (if needed add one hour to reservation time since the current user can keep it off through the end of their session). Turn OkoLab unit off when you are done.
CO2: if you do not need it, set the controller to zero (0%), so the unit does not beep at you or anyone else.
Openings: No openings! Cover all the openings if it is possible. ex. 2 slide holder: if you use one slide, fill the other slide position with a glass slide. For the few people with special chambers that cannot fill the opening, ok, you are special.
Sept 28, 2018: Extended imaging sessions: we ask that users who require a lot of time in one day (i.e. >6 hours) work out how to conduct the imaging to additional user(s) to image the same workday, whenever possible. For example, rather than book 9am-5pm, get to know the instrument and your specimens performance on it, so you can acquire overnight from say 4pm-12midnight (unattended, if no liquid perfusion involved). For very long experiments, please build up your skill set(s) to run from (say) 4pm Friday to 9am Monday. The Olympus ZDC (zero drift compensation) device works well and enables stable focus -- especially in conjunction with the OkoLab stage top + shroud environmental control unit to maintain constant temperature (and humidity, and CO2 control for experiments needing these).
The main exception is the major project that proposed to do 24 hour imaging sessions, every week, for 6 months. If the users end up conducting over weekends, great; if their experiiment will work best for them during work week, that is fine: the experiment was part of the reason we were awarded the S10 grant.
Sept 25, 2018:
* John Gibas optimized the network connection between our FV3000RS computer and our file server so that 10 Gbit Ethernet direct connection is working well. Thanks John! Our server is connected to the campus network by 1 Gbit (the Ross Bldg network). As part of our teaching image core users, we explain how to access our file server from JHU computers (we continue our longstanding policy of no usb drives on our computers ... we provide login capability on specific image core computers to enable users to transfer from our server to their JHU Microsoft OneDrive 5 Terabyte per staff member space for those labs whose PC's or Mac's cannot see our file server).
* OkoLab stage top and shroud incubator unit is up and running. We do have a CO2 tank available in the room. Please note that all experiments involving OkoLab incubator MUST have all openings in the insert covered to protect the "microscope insides" (objective lens turret etc) from humidity. We have placed 35 mm and 60 mm dishes, and slides, on the top of the cabinet, where all the inserts are also kept, to cover the openings.
Sept 5, 2018: Late arriving accessories status:
Oko Lab incubator expected to be installed mid-September.
730 nm laser and two external GaAs photomultiplier tube (PMT) detectors expected to be installed late October 2018.
Sept 4, 2018: Our FV3000RS was delivered and installed mid-August 2018. We anticipate image core manager George McNamara will be training the first cohort of users in late August through September 2018. Jason Brenner of Olympus is greatly helping by training users who need "advanced applications", such as FRAP time series (fluorescence recovery after photobleaching).
******
Priorities: the microscope is open access with prioritization for year 1 (Sept 2018-Aug 2019) primarily for the S10 projects it was purchased for.
Priority in year 1 is to enable our S10 grant Major and Minor project users to do the work the grant proposal was written for. We will accomodate additional projects (from M&M users labs, new pilot projects funded by the G.I. Center after the S10 submission), and additional users, if time slots are available. We recognize that many researchers need new data to help get new funding, so in addition to supporting our G.I. pilot project, we will do our best to help all researchers, whether on this FV3000RS or our other microscopes or even just advice. We also manage the ACCM confocal Microscope http://confocal.jhu.edu/current-equipment/leica-sp8-confocal-microscope so if FV3000RS is too busy with year 1 M&M Projects, please discuss with us use of the ACCM Confocal microscope - a very nice Leica SP8 confocal DMi8 inverted microscope.
*******
Published Olympus FV3000 Confocal image data --> Cellsens Deconvolvution
Hinman SS, Wang Y, Allbritton NL. Photopatterned Membranes and Chemical Gradients Enable Scalable Phenotypic Organization of Primary Human Colon Epithelial Models. Anal Chem. 2019 Dec 3;91(23):15240-15247. doi: 10.1021/acs.analchem.9b04217. PMID: 31692334
https://www.ncbi.nlm.nih.gov/pubmed/31692334
Figure below from Hinman et al, supplemental file, annotated by GM. "Advanced Maximum likelihood" (advmle) is an option in Olympus Cellsens "constrained iterative" (C.I.) deconvolution module (extra cost from Cellsens basic ... our advmle license was purchased on our FV3000RS NIH S10 grant and moved to our NIH P30 supplement co-founded FISHscope PC. So: you should cite both our S10 and P30 grant numbers if you publish data with our deconvolution software.
.jpg)
***
March 9, 2021: added brief section on FV3000RS DIC -- Differential Interference Contrast -- and Polarization Microscopy Settings (hint: Touch Panel AND "Ocular" tab - usually between LSM Imaging and Observation Method at top left of FLUOVIEW user interface).
DIC is a contrast method that enhances the contrast of many specimens beyond what brightfield microscopy can do. Currently (3/2021) our FV3000RS is our only microscope with DIC capability, Since DIC depends on several polarization components (polarizer, analyzer, two Wollaston prisms - and for confocal, the lasers) - the microscope also enables polarization microscopy.
* DIC and POL will only be taught to those who need it -- since rarely needed. In the context of basic training, this is likely to be a third two hour training session.
* Can be done simultaneously -- same scan track -- as fluorescence, so no extra time.
* We may be able to do something bizarre and/or wondersful on the FV3000RSL RGB DIC, for example of H&E stained tissue section. Hematoxylin is not fluorescent,absorbs at 488nm and 514nm; eosin is fluorescent ("tetrabromofluorescein") and used at much higher concentration than typical immunofluorescence, so can be bright. Eosin absorbs 488, 514, and 561nm light (and at lower extinction coefficient, 445nm) and fluoresces broadly from ~510nm to ~620nm -- and muscle etc more yellowy (i.e. 550nm emission) red blood cells redder (i.e. 560-650nm). We also can see some "not-so-near-infrared; on some slides (FV3000RS and FISHscope, ~750nm).
* Some objective lenses may perform better for DIC and POL than others: 30x/1.05NA excellent contrast DIC, 100x/1.35NA not so good contrast. Not a complete surprise since high NA ( >=1.25 NA) depolarize light. (as of March 10, 2021, 40x/1.25NA lens not tested). 10x lens excellent DICl 20x/0.75NA lens only good if lens is absolutely clean (George does the cleaning; users often mess it up).
References: Sanderson 2019 Understanding Light Microscopy (Eiley eBook), Pawley 2006 Handbook of Confocal Microscopy, Spring and Inoue (2012) Video Microscopy [ISBN-10: 1461376866].
Molecular Expressions - DIC introduction https://micro.magnet.fsu.edu/primer/techniques/dic/dichome.html
Molecular Expressions - Polarization Light Microscopy - https://micro.magnet.fsu.edu/primer/techniques/polarized/polarizedhome.html
The FV3000RS has two light paths for DIC, with many components in common:
1. by eye; Touch panel controls the components. Transmitted light LED --> "condenser path field aperture" [top front of condenser arm - usually shrunk all the way to suppress stray light of widefield fluorescence, needs to be open for DIC), and in focus) --> condenser (with polarizer and one Wollaston prism) --> specimen --> objective lens --> 2nd Wollaston prism and "analyzer" (the polarizer after the specimen), microscope base --> eyepiece (in prcinciple we could buy a camera for this microscope, but use would be dominated by confocal so why spend tghe money?).
2. by confocal: laser (any laser, usually 588, 561 or 640nm) --> (may not need polarizxer since laser is) Wollaston prism (below nosepiece) --> objective lens --> specimen --> condenser lens --> Wollaston prism --> "analyzer" --> "condenser path field aperture" (open for DIC) --> transmitted light detector..
Key info for this section (deliberately brief);
1. Get training from George if you think you need DIC (i.e. a separate two hour training session, part of the time is acquiring "demo" Z-series to illustrate how DIC behaves in 3D).
1a: do not self experiment on our hardware! If you mess up, you could break things (do you want to buy as a new confocal, thiws one was $442K), and you might leasve the light path(s) in a way the next user cannot get usable data (since we expect to train very few users).
2. Get the specimen to look good by eye by brightfield (touch panel), then with George's help, check POL even if briefly), then all DIC components (touch panel). Make note of "contrast" setting for DIC. For example, 2024 looked good for 30x/1.05NA objective lens and our training Eosin slide.
2a. *** Ocular tab in FluoView has a "DIA" (dia-illumination = transmitted light) drop down section. You can enable the DIC and POL components here, including Contrast. Please set "aperture" to be maximum size (0.55 NA). The Pol and DIC sliders and DIA NA aperture are also in "light path --> microscope; but the pol and DIC are not).