. Olympus FV3000RS Confocal Microscope_part2

. Olympus FV3000RS Confocal Microscope_part2
Location: fv3000_part2
20220614U - started Olympus FV3000RS Confocal Microscope_part2 because of web site limitation prevented adding more content to our fv3000 web page.
==> Please note Olympus is now known as Evident Scientific.
|
20241014M Coverglass info: No. 00 ~70 um (0.07 mm) No. 0 ~100 um (0.08 - 0.12mm) No. 1.5H 170 +/- 5 um (High precision) Ex: Marienfeld (Germany). notes: * I strongly recommend buying and routinely using #1.5H coverglass * Sometimes 2 coverglasses can be stuck together when you take them out of the box. I encourage checking EVERY coverglass for "pairs". A pair can be recognized by Newton's Rings appearing when you hold the coverglass(es) up to a light (ceiling light works fine). Positive control: you can hold 2 together. Another method is inspecting the edge: 2 stuck together appears thicker. You can also inspect the coverglass on edge (10x objective lens has a 1+ mm field of view; or use a mono-zoom or stereo microscope). * wrong coverglass thickness can result in spherical aberrations. * GM: if you refractive index match the immersion media (i.e. oil), coverglass (R.I. 1.518), and mounting media (i.e. cured Prolong Glass, R.I. 1.518) the light rays travel in a straight line = best imaging quality. This implies you could use a #00 or #0 or #1 coverglass and get additional working distance to see deeper into your specimen. |
20220808U: added "operations" - basic protocol - to this page (scroll down or "find" operations).
Quick news - more details below when noted.
June 14, 2022: FV31S-SW version 2.6 software now available - FluoView "viewer" software (GM has been using 2.1.x for years on office PC without problems, so if you have older FV31S-SW can likely continue with it fine). The installer is in a folder on H: on the FV3000RS PC (H: isthe fast HyperM2 drive array).
June 14, 2022: Olympus "FV3000 Red" web page now available, https://www.olympus-lifescience.com/en/landing/fv3000nir - near infrared fluorescence (NIRF). We have 730nm laser diode (LD730) and two GaAs PMTs (more sensitive >712nm than our four GaAsP PMTs). More on this at bottom (see "FV3000 Red" or 20220614U).
***
More information
**
20220614U June 14, 2022: Olympus "FV3000 Red" web page now available, https://www.olympus-lifescience.com/en/landing/fv3000nir - near infrared fluorescence (NIRF). We have 730nm laser diode (LD730) and two GaAs PMTs (more sensitive >712nm than our four GaAsP PMTs).
|
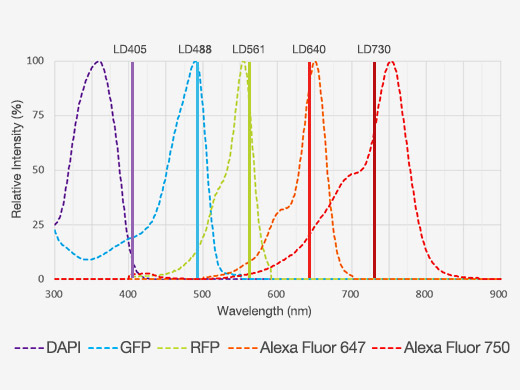
We have all five of these laser diodes plus 445nm and 514nm (CFP/mTFP and YFP/Citrine/Venus) |
|
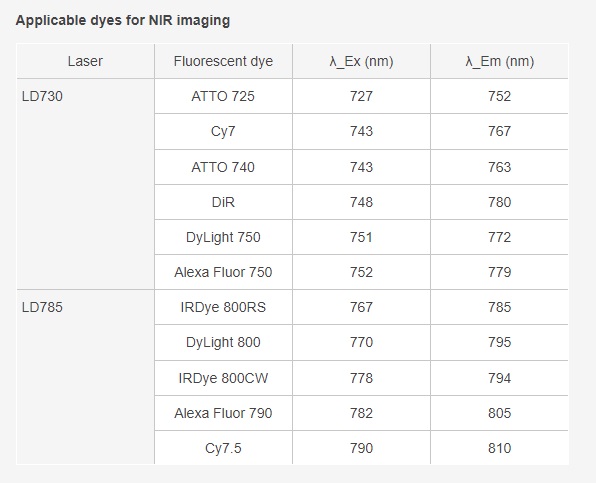
We have four GaAsP PMTs (green line) in the two internal decks plus two GaAs PMTs (red line). Evident web page touts GaAs as "high sensitivity" out to 890 nm. In practice, I suggest 850nm as more practical limit (~10% QE). that is "high sensitivity" is relative to the other two detectors face plates. None of the fluorophores in the table below have peak emission morethan 810 nm. |
|
|
|
NIR is well known for its low autofluorescence with respect to most human and other mammalian cells, most other eukaryotic animals and cells (C.elegans, zebrafish, mice, rats). Some plants and algaeandcyanobacteria may have high NIR fluorescence (chlorophylls and other molecules). Also "mouse chow" is made of plant material so animal G.I. gut content is often seen on NIR fluorescence images of whole mice. |
|
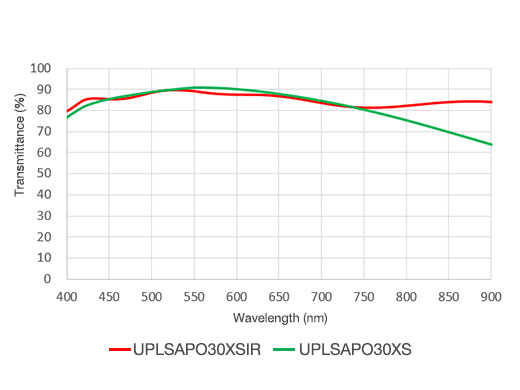
We have 30XS objective lens, also 40XS, 100XS. Currently (6/2022) Evident only offers XSIR as 30x lens: https://www.olympus-lifescience.com/en/objectives
|
|
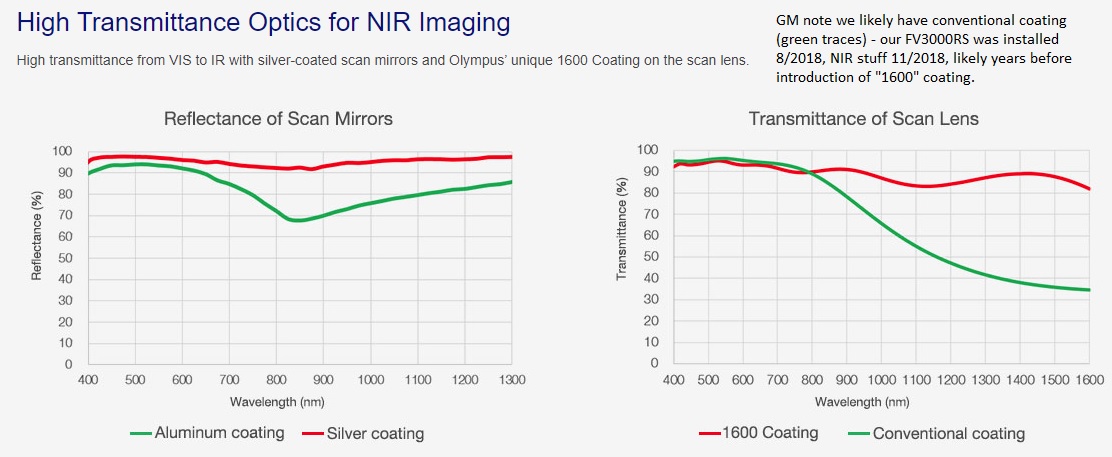
Our FV3000RS was delivered 8/2018, way before fancy new coatings developed. |


.
***
operations - recycling 20220808U email (that had more formatting than this note)
basic protocol for acquiring on our Olympus FV3000RS confocal microscope
Start session
Turn on lasers if not on already.
Open an image of your prior work … Re-Use (load acquisition parameters button).
Position your specimen. Tip: start with a bright positive specimen (optional: bring your favorite bright specimen with you every session, verify all is working well).
Put in folder and filename (top right of GUI) … H:\dept folder\lab folder\user folder\today_expt [make new folder in File Explorer], filename (informative wrt your expt, but not too long).
Find focus – usually by eye (touch panel).
Find interesting field of view.
At PC, select PMT Setting: Average = None, Image Size = 1024x1024 pixels, galvano mode (I am assuming “galvano” mode not resonant scanner mode … in galvano mode should always use speed = 2 usec/pixel, fastest setting).
Usually adjust zoom to 1x for biggest field of view … then can use optimal zoom (for image scan dimension you need for expt] later.
Double check that “Series” Time=OFF, Z=Off (and if you use during a session, change to OFF before you finish).
Sequential scan = FRAME (screen shot shows line – I almost always use “Frame”, reserve “line” for FRET experiments and similar special apps).
Live x4 button … find good focus (confocal: brighter is best focus, for thin specimens).
adjust Zoom, adjust field of view, focus, etc … I aim for specific pixel sizes for each objective lens, for optimal image quality (table on the wall), for example 20x / 0.75 NA lens I recommend 120nm XY pixel size.
May want to stop Live x4, switch “scan tracks” (Olympus called “Groups”), to check other fluorophore(s) channel(s).
Stop Live x4.
select PMT Setting: Average = [whatever # is good for you … signal-to-noise ratio improves with sqrt(#), so 4 average is 2x better, 16 average is 4x better data, than no average], Image Size = [whatever dimensions is good for you].
LSM Start button (top right corner of GUI).
Note: sometimes some user interface elements, such as LSM Start, are grayed out – this is usually because the TFT Touch panel is set to “eyepiece”. Best way to enable the PC GUI is to click Live x4.
Imaging:
Once first image acquired, alternate between eyepiece (TFT Touch panel “eye”) and live x4 (after changing “Average = none, image size = 1024x1024), then return “average” and image size and click LSM Start.
The software will append -001, -002, etc to filename if you do not change the name (ex. all field of view from one coverglass).
End session
Upload your data to your myJH à JH OneDrive (leave time to do this before your session end time … you can upload some files in the middle of your session so just have ‘last one’ to upload).
Check iLab (myJH à iLab à Ross Image Center à FV3000RS) to see if anyone has reservation after you that day … if no, then turn off the lasers.
Basics:
The “standard of care” for immunofluorescence microscopy on our confocal microscopes are:
DAPI = DNA counterstain
Alexa Fluor 488 = green fluorophore (usually brightest, easiest to see)
Alexa Fluor 568 (or Alexa Fluor 555 … pretty much equivalent) = “orange-red” fluorophore
Alexa Fluor 647 = “near infrared” fluorophore” (optional: see “More on seeing…”) at bottom.
If you use other fluorophores, George can probably get you good settings. Best to bring “single stain” controls.
More on seeing (or not seeing) by eye Alexa Fluor 647, Cy5, etc NIR fluorophores … (not visible to eye both because it is “NIR” and we do not have a filter cube for seeing it, since NIR … if someone would like to buy us a “Cy5 visible” Olympus IX83 filter cube, we could discount microscope time – see PubMed 10681398 (Ferri 2000 J Histochem Cytochem) for concept (they used an old school arc lamp – our Lumencor SOLA lamp may or not be optimal for using this … if you want to see Cy5 or Alexa Fluor 647 by eye, discuss with George trying to see it on our FISHscope before considering buying a cube for FV3000RS microscope).
***
Reserve Equipment